The measurement of the workpiece data is an indispensable part of the product design and development, as well as the production and production of the mold and even the final inspection of the product. The proper use of measuring tools is important, and conventional processing equipment is used routinely for measurement, which tends to make measurements faster and more accurate.
Let's take the development of a high-grade stainless steel pot as an example to briefly describe the application of the EDM machine in measurement. The main body of the pot and the side ear (the handle of the pot is called the side ear) is fastened with rivets. Therefore, the fitting degree of the side surface of the side ear and the side wall of the main body directly affects the firmness and aesthetics of the product. Under ideal conditions, the side wall of the pot and the side ear stick surface should be completely fitted. However, since the side wall of the pot is deformed during the actual production process such as stamping and drawing, the side ear sticking surface according to the figure cannot be implemented. The side walls of the pot are completely fitted. Considering that the stamping die of the pot is large in volume, numerous in process, and difficult to modify, the side ear sticking surface is usually corrected to the irregular spherical side wall actually produced by the pot, and then the development of the side ear mold is performed. That is, the side ear should be designed twice according to the actual side wall of the pot before the mold opening, and the data measurement of the actually produced pot side wall is involved here.
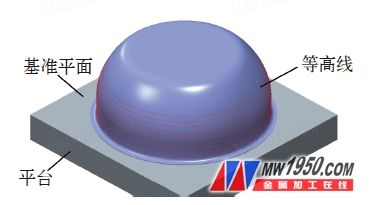
The usual practice is as shown in Figure 1: First, put the pot on the platform, use the platform as the reference plane, and draw the contour line on the side wall of the pot with the height gauge. Then use the caliper to measure the maximum and minimum distance of each layer of contour (actually the closed contour of each layer is an irregular circle).

figure 1
Finally, the measured data is inductively adjusted, and the 3D model of the actual pot is designed by CAD software, and the surface of the side ear is modified.
This measurement method is low in cost and can be used with ordinary measuring tools, but the disadvantages are obvious: first, the marking of the height gauge affects the appearance of the product, which is a lossy measurement; second, the diameter of the pot is too large or the pot is too High, it will exceed the measurement range of the caliper, so that the accuracy of measurement is reduced. Third, the more dense the contour, the higher the measurement accuracy, but the greater the workload. Of course, the use of three-coordinate measurement can solve the shortcomings of the traditional method, but the measurement cost is high and the cost performance is not high.
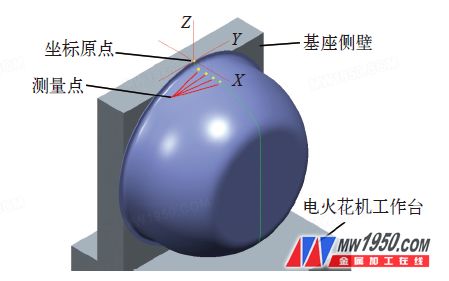
Through repeated practice, we found that contactless non-destructive measurement using EDM is effective. Specifically, as shown in FIG. 2: First, the pot is attached and fixed on the side wall of the base; secondly, the processed probe electrode (the metal round rod whose measuring end is conical) is clamped on the electric discharge machine. The cone points to the ground and is perpendicular to the working platform of the EDM machine. Thirdly, the EDM machine is used to modulate the two ends of the pot to complete the Y direction. Fourth, the conical tip moves to the Y direction and moves to the zero point. The side wall of the base is placed on the side of the base, and the side wall of the base is set to the zero point in the X direction. Fifth, the tip of the cone is moved to the zero point in the Y direction, and the function of the cutting head is used to make the tip of the cone to the zero point in the Z direction along the highest point; sixth, to three The zero point is the coordinate origin, the Y direction is unchanged, and the X-direction measurement points are incremented. The Z-direction uses the calibration function to model each measurement point, and records the coordinate values ​​of each measurement point. At this point, the measurement work is basically completed, the measured data is summarized and processed by CAD software, and after further fine-tuning, a three-dimensional model of the pot side wall with higher precision can be obtained. The advantages of contactless non-destructive measurement of the workpiece with an electric discharge machine are obvious: compared with non-contact measurement (such as camera-type three-dimensional measurement), the contact measurement accuracy is higher, and the calibration function of the electric discharge machine utilizes the on-off principle of current. Further achieve non-destructive contact.

figure 2
The application of high-precision gratings and bed-type clamping and movement are more efficient and precise than traditional manual measurements with ordinary calipers.
106cm Pvc Vinyl Wallpaper Vigour New Designs
China leading manufacturer and supplier of 106cm Design Pvc Wallpaper for Project Home Decor Wallpaper
Wallpaper Material: PVC/Vinyl
Wallpaper Size: 1.06*10m, 1.06*15.6m
Wallpaper Style: Flowers
Wallpaper Weight: 200 - 550g/sqm
106Cm Pvc Vinyl Wallpaper,Bedroom Pvc Wallpaper,Morden Design Wallpapers,Living Room Wall Paper
SHAOXING VIGOUR DECORATION MATERIAL CO.,LTD , https://www.vigourwallpaper.com
