
Product introduction:
The automatic open flash point meter is used to determine the open flash point value and ignition point value of petroleum products. The instrument adopts electric ignition method and does not require any flammable gas. It fully complies with the method requirements of ASTM D92 (GB3536-2008) and GB267-88. Using ARM series high-performance microprocessors, electronic erase memory (can store thousands of data records), color liquid crystal display and touch screen, PID self-tuning and many other latest technologies.
The function and performance of the fully automatic open flash point meter are in line with the highest level at home and abroad. It is a special instrument for the oil, power, chemical, commodity inspection and other industries to replace imported products.
1. Open flash point test procedure:
(1) Turn on the power switch, the screen displays the welcome screen shown in Figure 1

Press the "Settings" button to enter the parameter setting function screen, as shown in Figure 2
Press the "record" button to enter the history record screen; as shown in Figure 3
Press the "Test" button to enter the sample measurement function screen;
(2) Time adjustment function screen

Use the "Project" key to select the adjustment item; use the "Increase" and "Decrease" keys to adjust the selected number; after the adjustment, press the "Save" key to write the current adjustment value to the instrument; press the "Exit" key to return to the screen 1.
(3) History record function screen
Press “Previous page†and “Next page†keys to view the record; Press “Print†button to print the record through the instrument's micro printer; Press “Delete†to delete the record from the instrument history record; Press “Exit†The key returns to screen 1.
(4) Sample measurement function screen
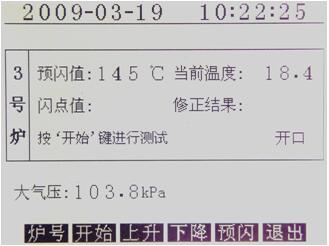
Figure 4 - Single oven configuration display
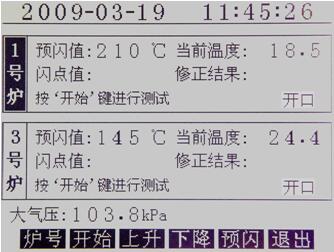
Figure 5 - Double oven configuration display
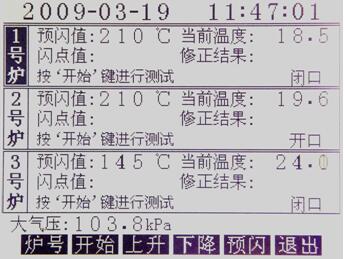
Figure 6 - Three-furnace configuration display

◆ Press “Burn number†key to switch the test oven corresponding to the key operation.
◆ Press “Start†key to test the furnace start test, and the “Start†key will be displayed imaginarily. Press the key again, the corresponding test furnace exits the test state, and starts the cooling fan, at this time, the “start†key is displayed.
◆ Press “Up†key to correspond to the test furnace elevation arm, then “Up†key is displayed imaginarily. Press this key again to stop the rising furnace arm and stop the cooling fan. At this time, the “Up†key is displayed.
◆ Press “Down†key to lower the furnace arm corresponding to the test furnace. At this time, the “Down†key will be displayed imaginarily. Press this key again, the corresponding test furnace stops lowering the oven arm and stops the cooling fan. At this time, the “down†key is displayed.
◆ Press “Preflash†key to set the pre-flash point value of the corresponding test furnace, and stop the cooling fan; use the “Increase†and “Decrease†keys to adjust the value. Press these two keys for a long time to generate a quick adjustment action.
The preflash value setting should follow the following method: When the flash point value is 200°C, set the preflash value to be lower than the flash point value of 10°C to 190°C. If the flash point temperature of the oil sample is not set, set the flash point temperature critical value. The value is then set from low temperature to high temperature.
◆ Press “Exit†key to exit the test state, all test furnaces will stop any action and return to Screen 1.
The instrument automatically tests the current atmospheric pressure value and automatically calculates the flash point correction value according to the GB/T267-88 standard, which is displayed on the lower part of the test screen.
(5) Test result display screen
In accordance with the test procedures required by the GB/T267-88 standard, atmospheric pressure corrections are made, test results are recorded, and the cooling fan is started.
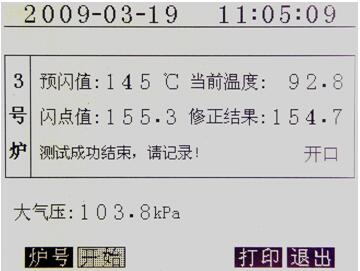
During the testing process, various faults are detected and the user is prompted. The user can take corresponding solutions according to the contents of the fault prompts.
There are two ways to start the cooling fan:
1) After entering the test state, press the "Start" button again to exit the test state and start the cooling fan;
2) The end of the test process or other reasons The test process enters the stop test state and starts the cooling fan;
There are four ways to stop the cooling fan:
1) Press "Exit" key to exit the test screen and stop the cooling fan at the same time;
2) Press "pre-flash" key to set the pre-flash value and stop the cooling fan at the same time;
3) After pressing the "up" button, press the "up" button again to stop the rise and stop the cooling fan.
4) After pressing the "DOWN" button, press the "DOWN" button again to stop the cooling and stop the cooling fan.
Indoor Lighting,Home Ceiling Lighting,Led Flat Tube Batten Light,Indoor Led Linear Light
JIANGMEN MICHEN LIGHTING CO.,LTD , https://www.jmledbulb.com